Showing posts with label TUTORIALS. Show all posts

Thursday, December 10, 2015

How To Use XT181 + Psiphon On PC To Have Full Access To Open Any Website

Today i will show you how i connect my XT181 and Psiphon3 for PC together to have full access to internet connection, safe and secured sites. All you need to do is to have both XT181 and Psiphon3 on your PC, Then connect them all and enjoy unlimited browsing on your PC.

How To Get started!!!:
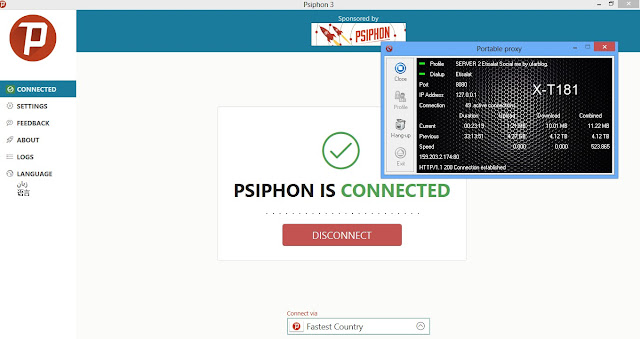

Click HERE To download Psiphon3 for PC

Click HERE To download XT181

After Downloading the above softwares,
Open XT181 app and connect it as you normally connect, by selecting "Profile" and click on "Listen"
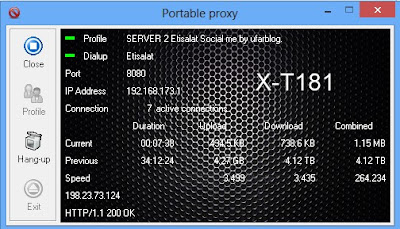

Now launch your Psiphon3 for PC and set it as follows;
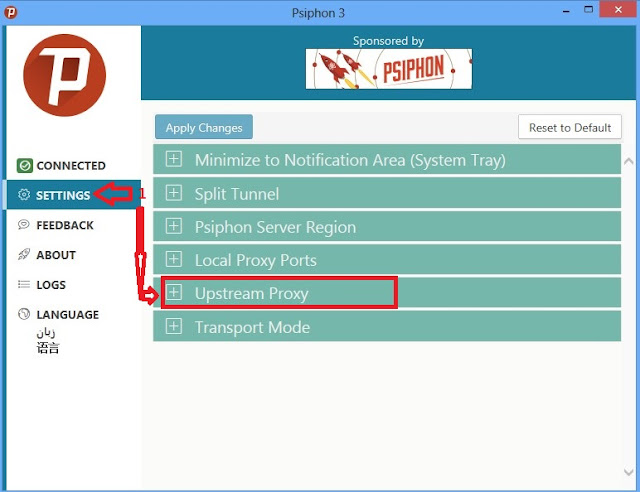
=> Go to Settings
=> Scroll down to "Upstream Proxy" and click it

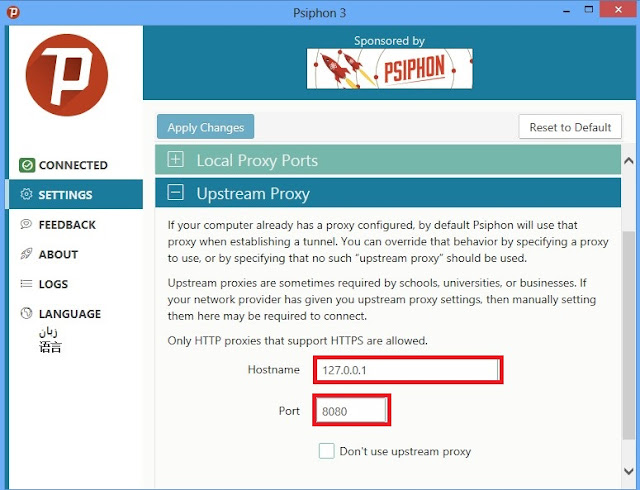
Then set Hostname as 127.0.0.1 and Port as 8080

Now click-> Connect and wait for the Psiphon3 to show "Connected"
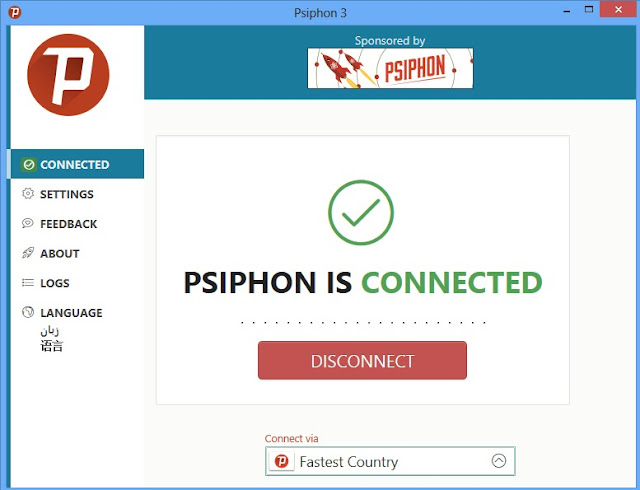


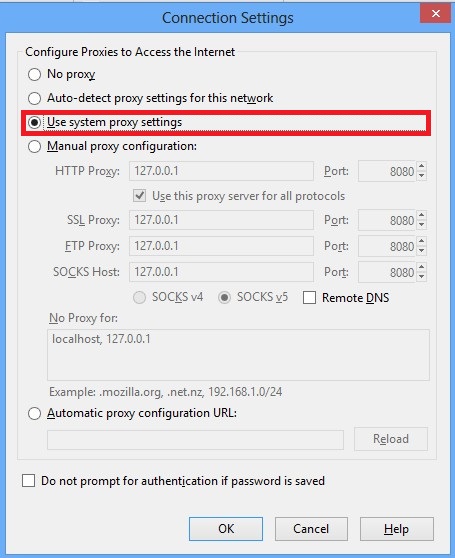
Then go to your-> Web Browser and set it to "Use System Proxy Settings"


ENJOY!!! 

Thursday, October 8, 2015

UPDATED HOW TO CHANGE HTC IMEI IN SIMPLE STEPS.

Note: Make Sure Your Phone Is Rooted.
Disclaimer: Please note that doing this is illegal in some countries. You’re doing this at your own risk and I won’t be held responsible for any damage caused.
Requirements:
1. Java must be installed on your PC since Android SDK needs it. Skip this step if you’ve already done that.
2. Download and install Android SDK HERE 
3. Download and install PdaNet HERE;  and select HTC while installing the driver. Be sure you’re connected to the internet and only plug in your phone when asked to.
 4. Download Fastboot. HERE;
Extract the “Android” folder in it to the C: drive on your PC. You should now have C:Androidfastboot.exe in this location. Be sure the path is correct.

 Steps To Change Your HTC IMEI:
Make sure you are already having the IMEI you want to change it to written down.
==> Disconnect your phone from your PC and power off the phone completely.
Enter Bootloader by pressing the Volume Down button and Power button simultaneously for about 10 –> 15 seconds.
==> Select Fastboot and connect your phone to the computer with USB.
You should have FASTBOOT USB displayed as shown below:

==> Press the Start button + Run your keyboard to type a Run command. Type cmd and press Enter.
==> Type this cd C:Android
Now type this fastboot getvar imei
==> This should display similarly as shown below:
This displays your original IMEI. write this down somewhere in case of unforeseen events.
==> Now type this fastboot oem writeimei 35826xxxxxxxxxx
Be sure to change 35826xxxxxxxxxx To the IMEI number you generated earlier.
You should get an OKAY message which signifies the process was successful.

ENJOY!!!


Thursday, April 23, 2015

UNLOCK ANY NOKIA MOBILE PASSWORD PROTECTED PHONE IN JUST A MINUTE (UPDATED)

FOLLOW THE BELOW STEPS TO UNLOCK YOUR NOKIA PHONES
1. First (Press *#06#) To view your phone IMEI Code and then write it down.
2. Then Click HERE
3. It will Show A Box & Enter The IMEI Code of the phone you want to unlock.
4. Then Tick I`m legal owner of the phone with that IMEI you provided.
5. Now Click Generate button. Now you will see Master Code.
6. Now use the generated Master Code to Unlock Your Mobile Password protected phone .

 ENJOY!!!


Wednesday, December 10, 2014

CHANGE IMEI OF ANDROID MTK SMARTPHONE WITHOUT PC

Change IMEI of MTK Smartphone

For changing the IMEI no you just following this instructions...


English version Screenshots:
Description:
 Mobileuncle Tools is power tools for MTK android device:1 display device info
2 information of device and running status
3 easy open engineer mode and MTK engineer mode
4 backup IMEI for MTK mobile
5 recovery online update
6 easy update tool via sdcard
7 Enable USB Mass Storage Device,connect cable first
8 crack operator GPRS lock for MTK
9 free the network access limited via GPRS
10 power GPS search
11 Power the gps search satellite ability
12 enable AP
13 easy reboot to recovery


Backup Your Valid IMEI Number,
Its really difficult to get for individual, So take copy IMEI no of your old unused mobile phone, and be sure we will never switch on the phone ever again. If you switch it on, the both sim will not register to the network. Its all done….

Instructions
Go to Engineer mode in mobile Uncle tool
  • Select Engineer mode[MTK]
  • Go to CDS information
  • Select Radio Information 

Here you can see Phone1 and Phone2, in that select phone2, because most of the Chinese clone phone the 1st Sim which is a 3G will work perfectly. Only the problem happens when we insert the second sim. If you check you can see the IMEI of 1st sim will start with 35xxxxx and the 2nd will start with 88xxxxxxxx. That is why the second sim is not able to register to the network, because its not in international formatted IMEI. So usually we need to change the IMEI of phone 2.
Select the phone 2
Here you can see a command line with “AT+”. Now just add this command to it
AT+EGMR=1,10,”15 digit YOUR NEW IMEI NO”
And press “send at command” button.


[ if you want to change the the phone 1 IMEI AT+EGMR=1,7,”NEW IMEI NO”]
Yes we all done… now you can restart the phone and check the IMEI by pressing *#06#
 ENJOY!!!


HOW TO SWAP YOUR ANDROID IMEI TO BLACKBERRY IMEI

How Can I Generate Blackberry IMEI Myself you ask?
==> Download This Software to your PC HERE
 ==> Unrar the file and copy and paste the three .sys files inside the
folder to your C:\Windows folder
==> Double click on GIPv4.1 to open
==> Click on Generate imei. Copy down the BB imei you see without the
pin except you have an ulterior motive.
How Can I Change My Android IMEI Number To Blackberry?
Disclaimer: Changing of IMEI is illegal in some countries, and I will
not be held responsible for any consequences that befall the changer.
Also, backup your original imei in case anything goes wrong then revert
using the above procedures for changing.
Before you begin, back up your Android phone. Use the below url to
download the backup app. Download HERE Or HERE
should in case it get bricked.
There are two ways you can easily get this IMEI changing done which
are Mobile Uncle and Terminal Emulator.
How to Change IMEI Number Through Terminal Emulator of Android Phone-Tab
For Single Sim Device.
Requirement:
1. Root Device
2.Terminal Emulatör Download From Play Store

1. Open Android Terminal Emulator
2.Type SU then press ENTER button to get Superuser permmison
3.After that, type this command then press ENTER button
echo ‘AT+EGMR=1,7,”IMEI_NUMBER”‘ >/dev/pttycmd1
or
echo AT+EGMR=1*7*IMEI_1 >/dev/pttycmd1

For Dual Sim Phones:
1. Rooted Android phone or tablet.
2. Install Android terminal emulator app
3. Open android terminal emulator.
4. Type SU then press ENTER
5. Type following command then Enter echo ‘AT+EGMR=1,7, “IMEI_NUMBER”
‘ >/dev/pttycmd1

6. If your phone is dual-sim, typ this command then ENTER
echo ‘AT+EGMR=1,10, “IMEI_NUMBER” ‘ >/dev/pttycmd1
7. Last step, Reboot your phone/tablet and done.

ENJOY!!!

Thursday, November 13, 2014

LIST OF RUN COMMANDS EVERY WINDOWS USERS MUST KNOW

All of the Run Commands below will work on windows xp, windows 7 and windows 8. However some do require that you have the application associated with the command installed. To open RUN Command dialogue box click start and type “RUN”, select RUN from populated list or Press Windows Key+ R.

Run Commands:

  1. Accessibility Controls = access.cpl
  2. Accessibility Wizard = accwiz
  3. Add Hardware Wizard = hdwwiz.cpl
  4. Add/Remove Programs = appwiz.cpl
  5. Administrative Tools = control admintools
  6. Adobe Acrobat ( if installed ) = acrobat
  7. Adobe Distiller ( if installed ) = acrodist
  8. Adobe ImageReady ( if installed ) = imageready
  9. Adobe Photoshop ( if installed ) = photoshop
  10. Automatic Updates = wuaucpl.cpl
  11. Basic Media Player = mplay32
  12. Bluetooth Transfer Wizard = fsquirt
  13. Calculator = calc
  14. Ccleaner ( if installed ) = ccleaner
  15. C: Drive = c:
  16. Certificate Manager = cdrtmgr.msc
  17. Character Map = charmap
  18. Check Disk Utility = chkdsk
  19. Clipboard Viewer = clipbrd
  20. Command Prompt = cmd
  21. Command Prompt = command
  22. Component Services = dcomcnfg
  23. Computer Management = compmgmt.msc
  24. Compare Files = comp
  25. Control Panel = control
  26. Create a shared folder Wizard = shrpubw
  27. Date and Time Properties = timedate.cpl
  28. DDE Shares = ddeshare
  29. Device Manager = devmgmt.msc
  30. Direct X Control Panel ( if installed ) = directx.cpl
  31. Direct X Troubleshooter = dxdiag
  32. Disk Cleanup Utility = cleanmgr
  33. Disk Defragment = dfrg.msc
  34. Disk Partition Manager = diskmgmt.msc
  35. Display Properties = control desktop
  36. Display Properties = desk.cpl
  37. Display Properties (w/Appearance Tab Preselected ) = control color
  38. Dr. Watson System Troubleshooting Utility = drwtsn32
  39. Driver Verifier Utility = verifier
  40. Ethereal ( if installed ) = ethereal
  41. Event Viewer = eventvwr.msc
  42. Files and Settings Transfer Tool = migwiz
  43. File Signature Verification Tool = sigverif
  44. Findfast = findfast.cpl
  45. Firefox = firefox
  46. Folders Properties = control folders
  47. Fonts = fonts
  48. Fonts Folder = fonts
  49. Free Cell Card Game = freecell
  50. Game Controllers = joy.cpl
  51. Group Policy Editor ( xp pro ) = gpedit.msc
  52. Hearts Card Game = mshearts
  53. Help and Support = helpctr
  54. Hyperterminal = hypertrm
  55. Hotline Client = hotlineclient
  56. Iexpress Wizard = iexpress
  57. Indexing Service = ciadv.msc
  58. Internet Connection Wizard = icwonn1
  59. Internet Properties = inetcpl.cpl
  60. Internet Setup Wizard = inetwiz
  61. IP Configuration (Display Connection Configuration) = ipconfig /all
  62. IP Configuration (Display DNS Cache Contents) = ipconfig /displaydns
  63. IP Configuration (Delete DNS Cache Contents) = ipconfig /flushdns
  64. IP Configuration (Release All Connections) = ipconfig /release
  65. IP Configuration (Renew All Connections) = ipconfig /renew
  66. IP Configuration (Refreshes DHCP & Re-Registers DNS) = ipconfig /registerdns
  67. IP Configuration (Display DHCP Class ID) = ipconfig /showclassid
  68. IP Configuration (Modifies DHCP Class ID) = ipconfig /setclassid
  69. Java Control Panel ( if installed ) = jpicpl32.cpl
  70. Java Control Panel ( if installed ) = javaws
  71. Keyboard Properties = control keyboard
  72. Local Security Settings = secpol.msc
  73. Local Users and Groups = lusrmgr.msc
  74. Logs You Out of Windows = logoff
  75. Malicious Software Removal Tool = mrt
  76. Microsoft Access ( if installed ) = access.cpl
  77. Microsoft Chat = winchat
  78. Microsoft Excel ( if installed ) = excel
  79. Microsoft Diskpart = diskpart
  80. Microsoft Frontpage ( if installed ) = frontpg
  81. Microsoft Movie Maker = moviemk
  82. Microsoft Management Console = mmc
  83. Microsoft Narrator = narrator
  84. Microsoft Paint = mspaint
  85. Microsoft Powerpoint = powerpnt
  86. Microsoft Word ( if installed ) = winword
  87. Microsoft Syncronization Tool = mobsync
  88. Minesweeper Game = winmine
  89. Mouse Properties = control mouse
  90. Mouse Properties = main.cpl
  91. MS-Dos Editor = edit
  92. MS-Dos FTP = ftp
  93. Nero ( if installed ) = nero
  94. Netmeeting = conf
  95. Network Connections = control netconnections
  96. Network Connections = ncpa.cpl
  97. Network Setup Wizard = netsetup.cpl
  98. Notepad = notepad
  99. Nview Desktop Manager ( if installed ) = nvtuicpl.cpl
  100. Object Packager = packager
  101. ODBC Data Source Administrator = odbccp32
  102. ODBC Data Source Administrator = odbccp32.cpl
  103. On Screen Keyboard = osk
  104. Opens AC3 Filter ( if installed ) = ac3filter.cpl
  105. Outlook Express = msimn
  106. Paint = pbrush
  107. Password Properties = password.cpl
  108. Performance Monitor = perfmon.msc
  109. Performance Monitor = perfmon
  110. Phone and Modem Options = telephon.cpl
  111. Phone Dialer = dialer
  112. Pinball Game = pinball
  113. Power Configuration = powercfg.cpl
  114. Printers and Faxes = control printers
  115. Printers Folder = printers
  116. Private Characters Editor = eudcedit
  117. Quicktime ( if installed ) = quicktime.cpl
  118. Quicktime Player ( if installed ) = quicktimeplayer
  119. Real Player ( if installed ) = realplay
  120. Regional Settings = intl.cpl
  121. Registry Editor = regedit
  122. Registry Editor = regedit32
  123. Remote Access Phonebook = rasphoneRemote Desktop = mstsc
  124. Removable Storage = ntmsmgr.msc
  125. Removable Storage Operator Requests = ntmsoprq.msc
  126. Resultant Set of Policy ( xp pro ) = rsop.msc
  127. Scanners and Cameras = sticpl.cpl
  128. Scheduled Tasks = control schedtasks
  129. Security Center = wscui.cpl
  130. Services = services.msc
  131. Shared Folders = fsmgmt.msc
  132. Sharing Session = rtcshare
  133. Shuts Down Windows = shutdown
  134. Sounds Recorder = sndrec32
  135. Sounds and Audio = mmsys.cpl
  136. Spider Solitare Card Game = spider
  137. SQL Client Configuration = clicongf
  138. System Configuration Editor = sysedit
  139. System Configuration Utility = msconfig
  140. System File Checker Utility ( Scan Immediately ) = sfc /scannow
  141. System File Checker Utility ( Scan Once At Next Boot ) = sfc /scanonce
  142. System File Checker Utility ( Scan On Every Boot ) = sfc /scanboot
  143. System File Checker Utility ( Return to Default Settings) = sfc /revert
  144. System File Checker Utility ( Purge File Cache ) = sfc /purgecache
  145. System File Checker Utility ( Set Cache Size to Size x ) = sfc /cachesize=x
  146. System Information = msinfo32
  147. System Properties = sysdm.cpl
  148. Task Manager = taskmgr
  149. TCP Tester = tcptest
  150. Telnet Client = telnet
  151. Tweak UI ( if installed ) = tweakui
  152. User Account Management = nusrmgr.cpl
  153. Utility Manager = utilman
  154. Volume Serial Number for C: = label
  155. Volume Control = sndvol32
  156. Windows Address Book = wab
  157. Windows Address Book Import Utility = wabmig
  158. Windows Backup Utility ( if installed ) = ntbackup
  159. Windows Explorer = explorer
  160. Windows Firewall = firewall.cpl
  161. Windows Installer Details = msiexec
  162. Windows Magnifier = magnify
  163. Windows Management Infrastructure = wmimgmt.msc
  164. Windows Media Player = wmplayer
  165. Windows Messenger = msnsgs
  166. Windows Picture Import Wizard (Need camera connected) = wiaacmgr
  167. Windows System Security Tool = syskey
  168. Windows Script host settings = wscript
  169. Widnows Update Launches = wupdmgr
  170. Windows Version ( shows your windows version ) = winver
  171. Windows XP Tour Wizard = tourstart
  172. Wordpad = write
  173. Zoom Utility = igfxzoom                                 ENJOY!!! 
  174.  

HOW TO COMPLETE FILEICE SURVEY 2014

Fileice is a Pay Per Download (PPD) site from which you can download your files after completing a survey. Of course, completing Fileice survey is not a piece of cake. It requires your patience and those who don’t have patience like me don’t bother to complete the survey, but unfortunately they may need that file badly. There are lots of tricks you can find in internet to complete Fileice survey but most of them don’t work. So finally we are going to teach you some working tricks to  Complete Fileice Survey and if one doesn’t work for you always try the next one.

Bypass Fileice Survey Using Using Quickdl Method:
* If you are using a VPN connection then use the Indian proxy. For Indian proxy go to:  Gather Proxy Indian Proxy List. If you are from India, no need to use Indian proxy!
* Now you have to clean all your browsing history and cookies from your browser.
* Now we need to change those Fileice URL with Quickdl URL.
for ex:  Change http://fileice.net/download.php?file=3y5d3 to http://quickdl.net/3y5d3
* Now open the newly created link “http://quickdl.net/3y5d3″.
* In next page click on free download option and select “Play rummy on Indias #1 site!” survey.

 * Now fill the information box with fake info using: fakenamegenerator.com
* Now use fake email generator if it asks for your email: fakemailgenerator.com
* You can use your real name and email address too. But you may get promotional offers from different site. * After the registration complete, verify your email id.
* At last a full open page will open and your download will start immediately.

Bypass Fileice Survey Using Zenmate method: 
For your information this method works best with Google Chrome Browser. 
* Download and install Zenmate extension from here:  Zenmate Google Chrome Extension Download Link. * After installing, Zenmate extension will appear next to address bar, now click on it. 
* In the case if it’s not turned ON, turn it ON by toggle given in the bottom.

* Click on the ‘change location’ link in the left bottom corner and change your current location to USA. 
* Now you have to clear you browsing history, cache and cookies from your browser by going menu – tools Clear browsing data or pressing Ctrl+ Shift+ Del.  
* Now go to your Fileice survey link and choose “Regular Download” option. 
* You will see some surveys and choose one of those surveys. All the survey here you saw are simple and easy to complete, because Fileice have a lot of advertisers in United States. 
* Now it will redirect you to your survey page, complete the required text boxes with fake info. 
* In case it asks for an email use fake email using email generator: fakemailgenerator.com  
* If it asks for your personal info generate fake details using: fakenamegenerator.com/  
* Now at last your file will start to download automatically.
I hope this post helped you to complete Fileice survey . If you know any other working tricks to bypass Fileice survey please share it in comments.

ENJOY!!!

Wednesday, November 12, 2014

RESET NOKIA PHONE PIN CODE TO DEFAULT CODE, e.g 12345 WITH ANT SIMPLE SOFTWARE

1. Downoad ANT Simple Software to your computer HERE to your computer from here; http://www.datafilehost.com/d/58e4d0b9

2. If you have Nokia PC Suite running, Be sure to close it by exiting it from the taskbar icon.

3. Extract "ANT SIMPLE V1.8.4 BY ANT TEAM TOOL" and run Simple.exe located in the folder.

4. Connect the phone vis USB to the computer.

5. On the MAIN tab, Click on "GET". Your phone IMEI number and model should be displayed on the bottom panel.

6. Now click on the-> "SERVICE" tab and click on-> "GET" button under USER CODE.

7. Your security code should now be dispalyed on the right side of the application waindow.

Screenshot:

ENJOY!!!

Sunday, October 5, 2014

HOW TO CHANGE YOUR IMEI NUMBER ON SAMSUNG MOBILE USING NV ITEMS READER-WRITER V1.0

Follow Below Steps To Get It Done.

Step 1. Download And Extract NV Items Reader and Writer Utility

Step 2. Place Your Device Into Diagnostic Mode -Most HTC (##3424)- Samsung (##3424) - Alternate
(*#7284#) - If One of these codes DOES NOT work for your device please be courteous there "ARE A LOT OF DIAGNOSTIC CODES GOOGLE IS YOUR FRIEND"

Step 3. Select Diag or Modem Mode. Most Will Be Modem, Samsung Will Be RMNET + DM + MODEM

Step 4. Connect Phone to Computer Using USB Cable and Run NV Utility as Administrator

Step 5. Press READ and Save Results. Samsung Devices Specifically 00550 Read This Address and It Will Save " IMEI AREA ONLY OF DEVICE "

Step 6. Converting Your IMEI To Search For it In Your Text You Just Saved, Note Your IMEI Example - 991112241949992
Now Seperate Your IMEI Into Blocks of 2 Leaving the
First Digit alone, Example - 9 91 11 22 41 94 99 92
Now Add 08 To The Beggining A After The First Digit and Reverse The Rest In Pairs,
* Example Before - 9 91 11 22 41 94 99 92
* Example After - 08 9A 19 11 22 14 49 99 29

Step 7. Run a Search Through the Text For This Hex
Version of Your IMEI/MEID Find it In Your Text Document

Step 8. Change To Your Desired IMEI/MEID and Write the Data Back To The Phone, Reboot and You Should Be Set.


Bonus Tool imei Converter
 
ENJOY!!!

Monday, September 29, 2014

RETRIEVE DELETED FACEBOOK MESSAGES, PHOTOS AND VIDEOS [GUIDE]

Today we will tell you that how to recover deleted facebook messages,photos and videos and much more on facebook. Basically its a Facebook Feature which not many people are aware of and hence we wrote this tutorial to let you guys know about this amazing feature/trick that facebook provides.
Many a times we delete messages,photos or videos from our profile which is not intentional but once we do , we cannot undo it, and its gone forever!
But wait, There is a saying: Nothing is Lost, until MOM can’t find it, Likewise in this case even if you delete anything from your facebook account, you can get it back. Facebook have all your data in their archive which you can download too.

How to recover ?
1. First of all,you will have to Here to open Facebook General account Settings.
2. Once you open your general settings, you will see Download a Copy of your Facebook Data. Click on it.
3. On the next page you will see a Download Archive Button. Click on it and you will be prompted to enter your password to continue (This is a security step by facebook)
4. After entering your facebook password, click on Submit. On the next screen you will be shown that the download link for your data will be sent to your email id which you used to create your facebook account.
5. Wait for few minutes and check your mail. You will see a mail from facebook in your inbox with downloading link ready for you to download all your data! :)
 6. Now after downloading the file, unzip it and open the folder where you will find your messages, photos, videos, pokes, friend list etc.:)

ENJOY!!!

Saturday, September 27, 2014

GLO BB ABSOLUTE AND GLO COMONTH THE DIFFERENCE.

Reasons Why You Should Go For Glo BB Absolute And Neglect Glo Comonth On Your Android/Blackberry.

Without much doubt, Glo network rocks real good in almost all location coupled with their unique Blackberry plan working on Android device. No more fear of data zapping, or cheapest data plan for Android even though the much adored Airtel 4gb plan for N1,500 has been stopped.

I’m going to share a secret with you all today and I’m pretty sure those using Glo on Blackberry will appreciate it and some Android users using Glo network. Glo BB Plan comes in two fold (the one I make use of ) Comonth and Absolute for N1000 and N1,500 respectively.


Differences Between Glo Comonth And Blackberry Absolute:
==> Glo Comonth allow you to have 1 web based registered email address attached to your device, while BBA allow you to have 10 registered web based email to your device.

==>BBA Plan comes with Blackberry Protect to back up all your contact, BBM messages etc on your device; while Comonth doesn’t have these features.

==> Data charge on Glo Comonth is slightly higher than BBA but the same 3gb data cap is allocated to both.
So if you have more than or want to configure more than one email address on your Blackberry or Android device, need Blackberry Protect, then this post is for you.

I’m sure you are aware you can top it up but I’ll show you how you can use Glo N1000 and still have access to N1,500 (BBA) features.

How Can I Use Glo Comonth( N1000 ) & Enjoy BBA (N1,500) Features?

==> Recharge your line with N1,500 and activate Blackberry Absolute plan by dialing *777*23#

==> 3Gb will be given to you which you can use on your Android or blackberry to expire in 30days…

==> Activate the number of web based email address you want to add to your device, blackberry protect etcuse it and exhaust the 3GB before the expiration of 30days (make sure you finish the whole MB before 30days expire)

==> Then activate Glo comonth plan the moment you exhaust your 3GB by dialing *777*21#

==> N1,000 will be deducted from your account and Comonth plan will be activated for you. While other features of your former Blackberry Absolute features remain active.

Note:This plan both works on all Blackberry 10 devices

You can then top up your datato extend your data expiration duration while you keep on flexing the N1,500 plan for N1000.

I’ve been using these features for a very long time and I felt I should share it out.

So why pay N1,500 for Blackberry Absolute when you can enjoy its features for just N1,000…
 
ENJOY!!!

Saturday, January 25, 2014

HOW TO OPT OUT OF AUTOMATIC ETISALAT BLACKBERRY VOICE PLAN SUBSCRIPTION WORKING

HOW TO STOP OR OPT-OUT FROM AUTOMATIC ETISALAT BLACKBERRY VOICE PLAN SUBSCRIPTION.
Here is how I solved the problem with so much ease:
1. Recharge your phone with N200 and Etisalat will immediately deduct N100. You now have a balance of N100.
2. The next step is to dial *399*2# on your phone and Etisalat should stop subscribing you to their voice plans automatically.
You should be able to recharge and enjoy your credit like before, without the fear of N100 deduction. I should also point out that the steps above did not work for some people but they were able to solve it by migrating to the Etisalat Easy Cliq plan. You can do this by dialing *244*1#.
If after this you still can?t solve this, call Etisalat Customer Care.

ENJOY!!!

Friday, January 10, 2014

CHECK SIM REGISTRATION STATUS AND VIEW YOUR MOBILE NUMBER

CHECK SIM REGISTRATION STATUS, ZAIN NG, GLO NG, MTN NG AND ETISALAT
ZAIN NG *746# SEND OK
                                            GLO NG TEXT REG TO 3456
MTN NG TEXT REG TO 746
ETISALAT NG *214# SEND OK

TO VIEW YOUR MOBILE NUMBER:
MTN *123*1*5# SEND OK
ETISALAT *248# SEND OK
ZAIN *405# SEND OK
GLO *135*8#5 SEND OK
 
ENJOY!!!

AIRTEL 20MB FOR N20 NAIRA WORKS ON PC/MOBILE

AIRTEL NG IS BACK WITH THE HOTTEST OFFER EVER, DO YOU KNOW YOU CAN ACTUALLY GET 20MB DATA BUNDLE WITH JUST N20 NAIRA ON YOUR AIRTEL LINE, THAT'S AMAZING!!!

HOW DO I GET THIS N20MB WITH JUST N20 NAIRA?
DIAL *712*20# AND SEND OK ON YOUR AIRTEL LINE AND YOU WOULD BE 20MB DATA BUNDLE VALID FOR 24HOURS (1DAY)

DIAL *141*712*0# TO CHECK YOUR DATA BALANCE.
HAVE FUN AND HAPPY SURFING!!!

ENJOY!!!

LEARN HOW TO BORROW AIRTIME/CREDIT FROM AIRTEL AND PAY ANYTIME YOU WANT.

AIRTEL NG IS THE ONLY NIGERIAN NETWORK OFFERING SUCH SERVICES.

NOTE: AS YOU PAY BACK YOU WILL PAY 10% INTEREST, THIS MEANS THAT IF YOU BORROW N200 NAIRA YOU WILL BE CREDITED WITH N180 NAIRA, BUT WHEN PAYING YOU WILL PAY N200 NAIRA.

NOTE: WHEN YOU BORROW AIRTIME, AFTER USING IT TO #0.00 NAIRA, ANY DELIBERATE RECHARGE YOU MAKE WILL BE DEDUCTED IMMEDIATELY UNTIL YOUR DEBTS ARE PAID.

HOW CAN I BORROW AIRTIME?:
THIS IS VERY SIMPLE TO DO AS YOU WILL HAVE NO STRESS IN DOING THIS, YOU JUST NEED TO TAKE SIMPLE STEPS.

STEP 1: DIAL *500# THIS WILL SHOW YOU A LIST OF RECHARGE CARDS TO SELECT FROM, YOU CAN RECHARGE UP TO N1000 NAIRA AIRTIME USING THIS BUT NOT MORE THAN N1000 NAIRA

STEP 2: SELECT OPTION WITH THE EQUIVALENT AMOUNT OF RECHARGE CARD YOU WISH TO RECHARGE AND YOU WILL BE CREDITED IMMEDIATELY ON YOUR AIRTEL SIM CARD.

THAT'S ALL, PLEASE DON'T FORGET YOU WILL STILL PAY BACK FOR THE AIRTIME YOU BORROWED.

HOW DO QUALIFY TO BORROW AIRTIME?:
TO QUALIFY TO BORROW AIRTIME, YOU MUST RECHARGE YOUR AIRTEL SIM WITH MINIMUM OF N200 AIRTIME FOR TWO CONSECUTIVE MONTHS.

NOTE: ITS NOT FOR THOSE WHO WANT TO GO AND BUY NEW AIRTEL SIM BECAUSE OF THIS OH!!!.
DIAL *500# AND YOU WILL BE LEFT WITH DIFFERENT OPTIONS ON HOW MUCH AIRTIME YOU NEED TO BORROW.

AS I BEGAN TO TYPE THIS, I JUST BORROWED N200 CREDIT FROM AIRTEL JUST NOW, THIS IS JUST TOO GOOD IN TIME OF EMERGENCY SOMETIMES YOU KNOW.

SHARE WITH YOUR FRIENDS!!!!

ENJOY!!!

WATCH ADULTS VIDEOS ON YOUTUBE WITHOUT REGISTERING ON YOUTUBE.

Hello everyone in this tutorial i will show you how to watch 18+ videos on youtube without you registering with youtube.
Go To a 18+  Video  https://www.youtube.com/watch?v=u0CIy9ZZEQE

in this case "u0CIy9ZZEQE" is your video code

Now change the url of the video to;

https://www.youtube.com/v/VIDEO CODE HERE?fs=1&amp

After changing the url will become like this;

https://www.youtube.com/v/u0CIy9ZZEQE?fs=1&amp?

Now you can watch 18+ videos on youtube without registeration hope you liked  this post.

ENJOY!!!